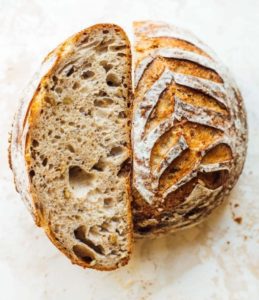
Did you know homemade sourdough isn’t actually sour? Nope. I mean there are recipes you can follow to try to make it extra sour, but it isn’t anything like the classic bagged loaves of “sourdough” you’d buy at the store. It is simply called sourdough because of the way it’s made. It is slow-fermented using wild yeasts (in your sourdough starter) to give it rise, without the need for commercial yeast.
Naturally fermented sourdough is often tolerated well by people with mild gluten sensitivities or IBS who otherwise avoid eating bread. I am in that category, as I suffer from IBS. The science behind it is this: wheat or rye in their raw state contain certain types of carbohydrates that are indigestible for some people. When they’re fermented, those particular carbs are vastly reduced, meaning the bloating, gas and discomfort associated is also vastly reduced. If not totally eliminated. The fermentation process also helps you more easily absorb the nutrients from the food you’re consuming. Just one more reason to make sourdough at home! Plus its no fuss, flexible with your schedule, and is only flour, water and starter!
Ingredients
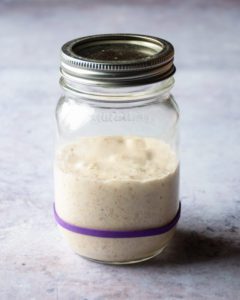
*Sourdough starter–approximately 100 grams will be used in this recipe. If you don’t already have one you can grab one here. If it’s not activated yet, check this article out on how to reactivate it first!
*Salt-10 grams. Sea salt, Kosher salt or Himalayan salt is preferred over iodized table salt.
*Filtered water– 345 grams (about 1.5 cups). Note that if you live in a very humid climate like Florida or Hawaii, you’ll want to scale back on the water content. Start off with 1.25 cups and add more if needed.
Before we dive in, just keep in mind that sourdough baking is generally a 2 day process. Don’t worry, most of the time it’s just sitting there, hanging out in various stages of fermentation. I will describe everything in detail below but I thought it would be helpful to go into it with this in mind.
Example timing: Say we want to bake a loaf on Saturday morning. We store our sourdough starter in the fridge, so we’ll need to take it out onThursday evening to let it sit and warm up overnight. Then we’ll feed it once or twice on Friday, and make dough with the active sourdough starter late Friday afternoon. The dough proofs in the fridge overnight, and is baked on Saturday morning. This schedule is what works for us. It’s not as complicated as it sounds, I promise! You’ll get your own groove down in no time!
Instructions
sTEP ONE: FEED SOURDOUGH STARTER
Bakers often call the process of feeding and readying your starter for baking “building your levian”. Levian is pretty much just another word for sourdough starter- a leavening agent, which causes fermentation to rise in dough.
When it comes time to add your starter into your dough, it should be at its peak activity level. Peak activity is when its bubbling in its container, has more than doubled in size, is no longer expanding/rising, but hasn’t yet started to fall back down and deflate.
The time it takes for a starter to reach peak activity is going to vary from home to home, depending on your yeast strains and strength, temperature conditions, and the flour it’s fed. The ideal temperature to activate a sourdough starter is around 75 degrees F.
Sometimes you may want to feed your starter twice before baking to achieve a nice healthy peak. For instance, we often feed our starter twice before using it if it has been chilling in the refrigerator for a week or two. Speaking of, if you keep your starter in the fridge like we do, you’ll need to plan a little in advance. We take the starter our the night before we want to make our dough, letting it sit out at room temperature to warm up overnight. The next morning we discard (removing about half out so you aren’t running out of your ears in sourdoughstarter) and feed it as soon as we get up and sometimes again midday before moving to next step.
STEP 2: mAKING THE aUTOLYSE
An autolyse is the term for a combination of flour and water allowed to sit and get happy together for about an hour before the salt and sourdough starter are added. As your sourdough starter is rising and getting close to peak activity, go ahead and get your autolyse made. As long as it’s bubbling and active, you’re good!
FLOUR
In a large mixing bowl, add 455 grams of flour total.
295 grams of bread flour (sometimes all purpose flour, just whatever we have on hand).
137 grams of whole wheat flour
23 grams of rye flour
WATER
Now add 345 grams of water. Try to use filtered water, and avoid chlorinated tap water. Running it through a basic carbon filter like a Brita will remove the chlorine. It is best to add room temperature water. If you add cold water, it can slow down the fermentation process.
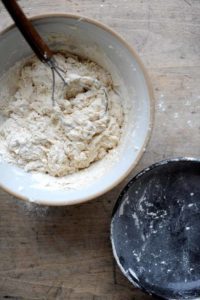
MIX & SIT
It’s time to get your hands dirty! So first, wash up really well. Now get your hands in there and thoroughly mix the 455 grams of flour with the 345 grams of water you added. Yes I know, at this point its a sticky hot mess. While mixing, I use a dough scraper to help get bits off the sides of the bowl and my hands helping to combine it all!
Congrats my friend! You Just made the autolyse! Now let this mixture sit for about an hour at room temperature! We cover our bowl with a damp tea towel to help prevent it from drying out!
STEP 3: ITS DOUGH TIME!
Once the autolyse (flour/water combo) has sat mixed for about an hour, and your starter is now at its peak activity, it’s time to combine them! Stick the bowl of autolyse on the scale, and measure out about 100 grams of active starter into it. What starter is left behind that didn’t get mixed will be your discard and you can store it in the fridge (and use it for other recipes like muffins, pancakes etc)
After the starter is added, now add the 10 grams of salt. Hand mix again. You can sort of pinch and fold the dough over and over to get it nice and mixed then move on to next step. Now place a damp tea towel on top to rest for another 15 minutes or so.
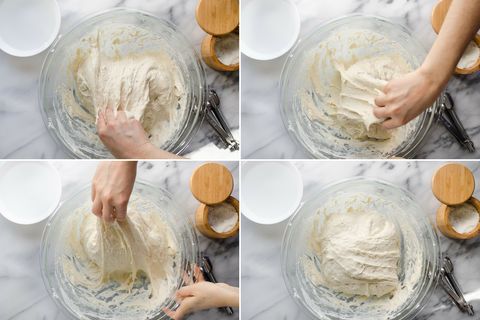
Now is the phase we call “bulk ferment” where the dough sits out on the counter for around 4 hours as you do a few sets of “stretch andfolds” in the duration it sits.
STEP 4: STRETCH AND FOLDS
Now come back and perform a set of stretch and folds. This introduces air and increases elasticity in the dough, helping it to become a solid loaf! About 3 or 4 sets about an hour apart is good, but sourdough is flexible and adapts to whatever schedule you’re on!
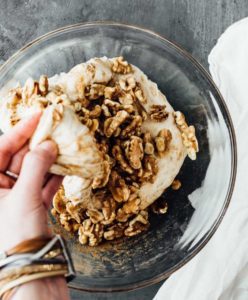
OPTIONAL: ADD GOODIES
During your stretch and folds is a good time to add goodies like herbs, nuts, seeds, or dried fruit (like blueberries or even chocolate)! Play around and see what you come up with!
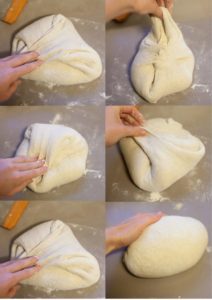
STEP 5: FORM THE LOAF
After the dough has been sitting in bulk ferment for about 4 hours, it is time to get it all shaped up! Give it one final stretch and fold to help it tighten up a bit! Then place the dough ball onto a lightly floured surface. If you doubled the recipe, here is where you would separate the dough into two even balls with your dough scraper, and then proceed to shape them individually.
To prepare the dough to go into a boule (round shape), grab the sides of the dough from opposite ends, pull and pinch them together in the center as shown below. Repeat this process on the alternate sides. Flip the dough ball over so its sitting on top of its pinchy side.
For “batard” loaves (oval shaped), you will do this similar process but doing most of the pulling, pinching and tucking from just two sides instead of all four. This encourages a longer loaf shape.
STEP 6: PROOFING BASKET
After forming the dough for the last time, ease your dough ball into a lightly floured proofing basket. Keep the pinched side of the dough down- that also keeps the shape you formed.
Now tuck it away in the fridge overnight! Cover it with a damp tea towel so it doesn’t dry out. Proofing is a term for the final fermentation andrise. This is where you could experiment with proofing. You could go anywhere from 6-12 hours or so overnight in the fridge. Play with times based on what works for you and see what varying results you get.
STEP 7: PREP TO BAKE
It is the next morning, your dough has proofed overnight, and you’re hungry. Its finally time to BAKE!
First, preheat the oven to 475 degrees F.
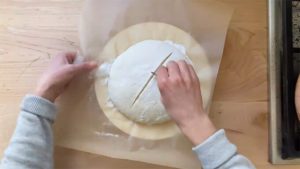
Once the oven has heated, grab your dough out of the fridge. If you choose to score your loaf, now is the time to do so then quickly place a piece of parchment paper on the bottom of the pan and slide your dough ball on top. Close the lid to trap the moisture inside while it’s cooking, then pop in the oven. Try not to leave the dough out at room temperature any longer than you have to.
STEP 8: BAKE
Place your loaf into the oven for 37-42 minutes (this will vary from oven to oven). Next pull it out and remove the lid. Quickly put it back in the oven to finish baking uncovered for a final 7-10 minutes or so. Once its finished quickly get the loaf out of the hot pan and onto a coolingrack!
LAST BUT NOT LEAST... let the loaf cool down about an hour before cutting into it. The steam is vital and still working inside so we don't want to cut into it too soon and risk it going flat on us!
And it's as simple as that! I realize it may not sound all that simple the first time you read this, or even the second time but just jumping in with both feet and DOING one step at a time will develop your skills and before you know it you'll be making sourdough in your sleep!
to strore fresh bread, you can stick it inside an old bread box or simply wrap it inside a clean tea towel and place it inside a brown paper sack. In a sack alone the bread dries out quickly. In a sealed container, it tends to get soft, stale and also risk molding. Fresh homemade bread inevitably gets a tad stale after a few days. When needed, a quick toast or broil can bring it back to life! I hope you found this helpful and if you try this please send me a picture of your creation!